
by Jay Bernardo
jay(at)loomsoft(dot)net
by Jay Bernardo
jay(at)loomsoft(dot)net
| Before we begin at all... | ||
| This
tutorial is part of the LoomSoft resources
section. It has been created for public viewing and that only. All materials
are copyright© 2002 by LoomSoft.
You may not use, reproduce, or distribute this or any other linked files
without permission. Web: http://www.loomsoft.net Email: jay(at)loomsoft(dot)net |
|
Disclaimer and Pre-Article stuffs. |
| Okay,
this tutorial is (hopefully) all about organizing your project; making it
easier to navigate; making your life more sane while you code. Please remember,
I've written this in my free time by myself. These are my general ideas
and opinions on how to go about organizing all your stuff to make things
play nice. By no means am I the "almighty seer of truth." :) These
are just the methods that I use and know work for me. If they work
for you, too, then hooray! I'll try to use images and screenshots as much
as possible if it would help to explain a key point or idea. If anything
it still unclear, just email me and I'll patch up my article. See the end
of the article for contact information and the such. It is assumed that you have some skills with coding, as I will refer to such things as classes, functions, variables, etc. Also note that I use Microsoft Visual C++ (MSVC) [version 6.0 {standard} if that's of any use to anyone]. This article will probably refer some stuff that's MSVC specific, so don't get upset when you see it! :) |
| 1. Why we want, and what it means to organize your project (this is basicallly just to get you thinking in the right "direction") |
|
I think it's safe to assume that at some point in all of our programming careers we've seen, or have even created games (or general programs) that were just a single source file. I'm not talking about the simple "Hello World" programs, either. I'm talking about bigger programs where each function, class, variable, pointer (you name it, it was in that file) was all declared within a single file. Unless you have memorized the name of each and every function you have created, it will be a pain to find what you're looking for while programming. Of course, there are visual tools that will list all functions within a file, but this too can be tedious if you have hundreds or even thousands of functions or declarations in your program. What we do to fix projects like this is organize them. Let me give you a definition that works in terms of this article. If your project is organized it will have: multiple files in which each file contains a central location for a specific type of data and or functions which serve a general purpose, or work together to perform this general task. Was that clear? Basically you want a seperate file for each different type of "stuff" you're doing. |
| 2. Naming files |
|
The first
thing I would ask you to notice is not the number of files, but the names
of the files. This is important when organizing your code. Each time you
create a new file for that "central location" of data, you will
want to name it correctly. This allows for you to be able to find what
you are looking for much quicker. Now seriously take a look at the names
of my files. If you don't know anything about the game, some file may
not make sense, but take a look at the more general named ones like: screenshot.cpp,
randomize,cpp, load_music.cpp, etc. You can easily imagine what kinds
of functions and variables are contained within each file: Note how easy it is to take a quick look at a specific list of files and be able to efficiently determine what kinds of functions and data are contained within. This is a major step in organizing your code. Think of names that are easy for you to understand, and quite possibly even easier for others to understand; especially if your project is opensource, or is being worked on in a team. If your file names are easy for others to read and quickly understand chances are it will be the same for you as well. Naming files can be tricky, however. It can lead to potiential problems such as simply having to rename the file later on due to the fact that it could be more generalized. This isn't really a big problem, though. It isn't very difficult to simply rename a file :) Just thought I would warn you, though! |
| Examples |
You
have just created a file which contains functions that scroll text across
the screen. |
| Back To Contents |
| 3. Separating Code into Multiple Files (Theory) |
| Alright, so now you've got the lowdown on how to name your files--but I haven't said anything yet which would lead you to have to name more than a single file! So.. here it is! How do
you detemine just when to separate one file into two or more nicely named
(see section 2) files? As I've mentioned in section
one. If your program consists of many classes, functions, variable declarations,
etc., all contained within one file this is definitely a good candidate
for separation. As always, there aren't any real solid rules on when to break up your code beyond this point. It's really up to you. You could contain all your drawing code within drawing.cpp, but I like to take it a step further. Consider this, I have a class called player (which is obviously defined within it's own header/source file). The player has it's own drawing routines. Instead of housing the players drawing routines within the drawing source file, the source file which contains player's declaration would contain player's drawing routines. Why do I do this when drawing.cpp is supposed to contain all drawing code? Well, it's simple. Since player's drawing routines really "belong" to player, the files containing the player definition should also contain the drawing routines. This way, when I think "I need to edit the player's drawing" I will instinctively think that it will be in the player's file, since all and everything having to do with the player is contained within that file. Therefore it is good practice to split things up this way. Furthermore, the actual call to the function that draws the player would be in drawing.cpp. See how things
eventually fall apart? Now the project may look something like this: Drawing.cpp
may look like: |
| Back To Contents |
| 4. Separating code into multiple files (Method) |
| Alright.
Now, there's two different methods we can use to implement the ideas you've
just learned about separating your code into multiple files. The two methods
are pretty general: Onto the
information! |
| Back To Contents |
| 4a. Separating using the keyword extern |
| To
explain how extern works, I will use the simplest
form possible, and then work up off of that, using examples. Feel free
to try out these examples for yourself, as it's through actually doing
that you will learn the most! First off, we need the original file, which
contains everything in it. Of course, in this example, splitting up such
simple code to be "organized" would prove to be pointless when
only dealing with a file which contains only two functions and some #includes.
Keep in mind that this is just for showing you how things are done. #include
<iostream.h> //Required header file for i/o streams int main()
// The main function. This is where the program starts void ask_question(void)
// A function to ask a question |
| Back To Contents |
| 4b. Separating using header files |
| A
header file works much like extern in the respect
that it lets you take things defined in one file and use them in a separate
file. It is also much powerful as you can, for instance, have it declare
all your externs for you so all you need to do is
include the said header file in each file you need to use the externs
in instead of having to redeclare the externs each
time. Okay, so lets take a look at some important stuff when dealing with
header files. You need to learn about #ifndef/#define/#endif.
These three keywords work together to allow a header file
to be used multiple times without warnings/errors about multiply definining
something. #ifndef _TEST_H_ int main()
// The main function. This is where the program starts void ask_question(void)
// A function to ask a question ask_question.h void ask_question(void); #endif Okay! So, as you can see, ask_question.cpp remained the same. The main function changed only slightly, as we removed the extern line, and instead added an #include which included the new ask_question.h. So, the only real new thing is ask_question.h. You can see that I've used the three keywords and have my declaration between the #define and #endif. It may be a bit confusing to see the declaration "void ask_question(void);", which is the same exact declaration as in ask_question.cpp. Why doesn't this produce a redefinition error? Well, if we were using this header file to allow access to, say, an integer, and in the header file we simply copied the declaration of that integer -- we would get an error. An extern would be required! Try putting an extern right before the line "void ask_question(void);" in ask_question.h. You will see that it still works! The reason that a function can be declared in a header file without extern and a variable can't isn't of utmost importance right now. Just know that with functions the extern is not required. Think of it as a little "trick." |
| Back To Contents |
| 5. Classes and header files |
| Alright,
so now we're ready to get into some more-advanced stuff. If you're not
comfortable with all the previous knowledge you've gained, please, play
around with the code and make lots of examples. Once you've become comfortable
with the information and understand how it all works, continue with the
article. Also, if you don't know what classes are and how to use them
-- go read up in your C++ tutorial somewhere. I will not be explaining
their use, but rather how to organize them with header files. int main()
// The main function. This is where the program starts |
| Back To Contents |
| 6. Summing it up |
| Sadly to say, this is about all I have to offer you! It should be enough to get you on your way with organizing your project. By simply using these methods, you can split up your code into easy-to-find files which will make your programming experience much easier. This is just my own opinion, however. It's up to you to try this style and see if it works. If it doesn't work for you, think about why it doesn't work. Then, go about and fix that problem. Eventually you will find a method that fits you perfectly and allows you to navigate through your code with ease. Good luck! |
| Back To Contents |
| 7. End Notes |
As
for an end to this much-too-long article, I would like to state once again
that what you have just read are my personal ideas and thoughts own how
to organize your project. In no way is this the "correct" way
to do so. In fact, it may be the most incorrect way to go about
structuring your program and it's files, but for me it works flawlessley
and effortlessly. I'm sure many other programmers would agree as well.
It's really up to you to decide what you like best, and what works best
for you. |
| Back To Contents |
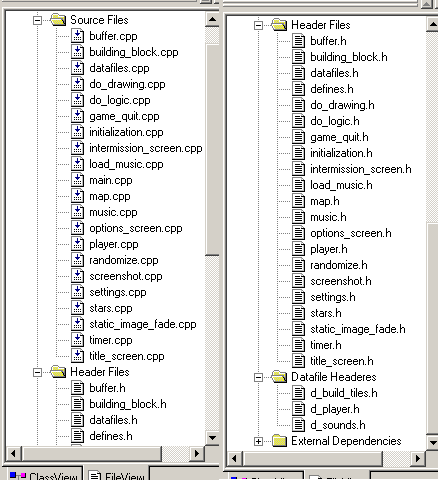 Let's
talk about the file names of an organized project. To the right is a screenshot
(actually, 2) of the MSVC workspace from my current project
Let's
talk about the file names of an organized project. To the right is a screenshot
(actually, 2) of the MSVC workspace from my current project